FlexDoc/XML - Oxygen XML Integration
1. Overview
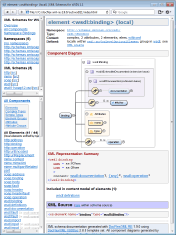
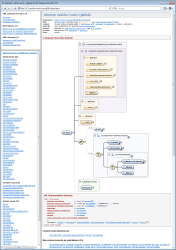
This integration will let you generated XML schema / WSDL documentation (using XSDDoc / WSDLDoc templates) with the automatic insertion of component diagrams produced by Oxygen XML Editor, with the full support of diagram hyperlinks.
 |
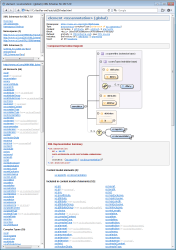 |
You can also download this demo documentation by the link: xslt20-xsddoc.zip (5.4 MB)
Key Features
-
Possibility to run OxygenXML from FlexDoc/XML
templates to perform specific tasks, namely:
- Launching OxygenXML's own XML schema documentation generator for the specified XML schemas with the specified options.
- Associating the diagrams (and hyperlink image maps) generated by OxygenXML with the DSM elements representing the XML schema components in templates and making them available (via Image Control) to be inserted in the output documentation generated by FlexDoc/XML.
-
Automatic insertion of XSD component diagrams produced by OxygenXML into the XML schema
documentation generated by FlexDoc/XML XSDDoc.
The diagrams can be generated in the following formats:
- PNG
- GIF
- JPEG
- Full support of diagram hyperlinks (in HTML output).
-
Processing of complex XML schemas with
<xs:import>,<xs:include>,<xs:redefine>of other XML schemas and generating single documentation for all involved XML schemas together with all OxygenXML diagrams in place. (See also: Using XML Catalog.) - Possibility to run the unified FlexDoc/XML+OxygenXML template-driven documentation generators from both:
-
Running multiple instances of OxygenXML concurrently, so as to employ the multiprocessing capabilities of your system.
When you generate documentation by lots of independent XML schemas, OxygenXML must be run separately for each of them in order to generate the XSD diagrams. That takes substantial time. Running OxygenXML in multiple concurrent threads allows processing several XML schemas simultaneously. That may accelerate the generation of diagrams several times!
See also: FlexDoc/XML | XSDDoc | Parameters | Diagramming | OxygenXML Integration | Multithread Processing
- Since both FlexDoc/XML and OxygenXML are based on Java, the integration is equally available on Note that there are special distributions of OxygenXML prepared for each of those systems!
Technical Requirements
-
Any edition of OxygenXML that includes its own
XML Schema Documentation
(for instance, “Oxygen XML Editor”).
Concerning which versions are supported, we have tested this integration starting from Oxygen XML 13. Actually, all comes down to the following:
-
The
schemaDocumentation.bat(orschemaDocumentation.shunder Linux) is included. -
All parameters/options of the OxygenXML's own doc-generator can be set via a special
config-file passed as the
schemaDocumentation.batargument. - It is also supported passing a custom XSLT style sheet, which receives as input some intermediate XML file (produced by OxygenXML) so as to generate from it any other type of output.
-
The structure of that intermediate XML file is backward compatible with the one generated by Oxygen XML 15.
The XSLT style sheet passed by the integration converts the XML file generated by OxygenXML into another XML file convenient for further processing by the integration Java code.
-
The
- Java version 9 (or later) installed on your system.
- A computer with 2 GB RAM (or more)
Licensing / Processing Modes
Being a complex piece of software, which took lots of efforts to develop, the OxygenXML Integration requires a separate licensing. Depending on your license, the integration may work in one of two different modes: full or trial, as described in the following table:
| Processing | Description |
|---|---|
| Full Mode |
The Full Mode is activated in the presence of a Full License for
“FlexDoc/XML OxygenXML Integration”.
This mode allows you to use the integration without any limitations. Once it is enabled, you may think about the integration as just another part of FlexDoc/XML executables. Anything else will depend on your other licenses. |
| Trial Mode |
The Trial Mode is activated in the presence of a Trial License for
“FlexDoc/XML OxygenXML Integration”.
In this mode, the integration will work the same as in the full mode.
However, no matter what your other licenses are the following limitations will be enforced:
|
See Also:
2. Getting Started
Since OxygenXML Integration is closely connected with the FlexDoc/XML core, all Java classes implementing it are included in the general FlexDoc/XML Java library:flexdoc-xml.jar.
However, to get it work, you will need to install a “FlexDoc/XML OxygenXML Integration” license and specify a few additional settings.
Obtain a License
The OxygenXML Integration requires a separate license, which you should receive by e-mail.
The license comes as a single 'flexdoc-xml-oxygenxml.license' file
or it may be included in a combined 'flexdoc-xml.license' file (along with other licenses).
In either case, you should save the license file in the 'lib' directory of your FlexDoc/XML installation:
-
{flexdoc-xml}/lib
'flexdoc-xml.jar' file).
It is also possible to specify any other location of your license file directly on the generator or template designer command line using the -license option.
Running on Windows
Here is a quick instruction how to run FlexDoc/XML+OxygenXML on Windows (without much investigation):-
Download the FlexDoc/XML archive and unpack it.
You will get some directory:
{flexdoc-xml} -
Save the
flexdoc-xml.licensefile (containing the “OxygenXML Integration” license) in the directory:{flexdoc-xml}\lib -
Now, go to the directory:
{flexdoc-xml}\integrations\OxygenXMLEdit
generator.batfound in that directory, in these lines:::---------------------------------------------------------------------- :: Specify the location of JRE/JDK 9 (or later) here ::---------------------------------------------------------------------- set JAVA_HOME=C:\Program Files\Java\jdk-14 ::---------------------------------------------------------------------- :: Specify the location of OxygenXML home directory ::---------------------------------------------------------------------- set OXYGENXML_HOME=C:\Program Files\Oxygen XML Editor 22
-
Run the
generator.bat. The Generator Dialog should appear: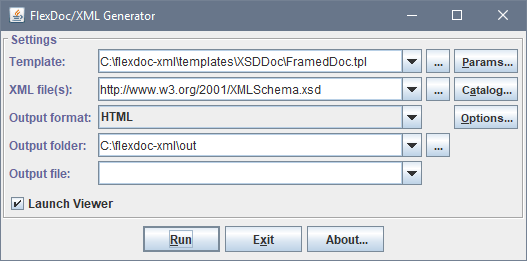
Now, you can test the generation of XML schema documentation with OxygenXML diagrams included.
Check that everything is specified as shown on the screenshot. Then, click the <Run> button. When the generation finishes, the result documentation should be open automatically in the default HTML browser.
Running on macOS
-
Download the FlexDoc/XML archive and unpack at some location (e.g. on Desktop).
You will get some directory:
{flexdoc-xml} -
Save the
flexdoc-xml.licensefile (containing the “OxygenXML Integration” license) in the directory:{flexdoc-xml}/lib -
Go to the directory (open it with the Finder):
{flexdoc-xml}/integrations/OxygenXML/macOSEdit
generator.commandfound in that directory to specify the location of OxygenXML installation directory:OXYGENXML_HOME="/Users/Shared/Oxygen XML Editor"
To be able to run
generator.command, first you need to assign it with the executable privilege as follows:Run the Terminal and type in it
'chmod u+x'followed by a space and the full pathname of the script file (instead of typing it, just draggenerator.commandfrom the Finder into the Terminal window). Then, press Enter. Now, you can rungenerator.commandfrom the Finder just by clicking twice on it. -
Run the
generator.command. The Generator Dialog should appear: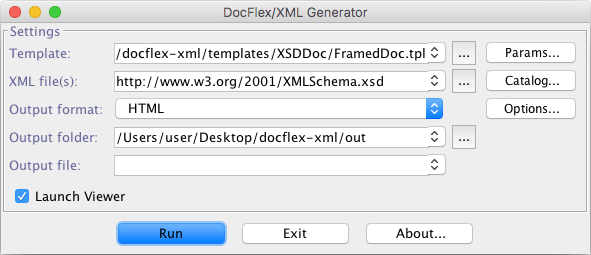
Now, you can test the generation of XML schema documentation with OxygenXML diagrams included.
Running on Linux
-
Download the FlexDoc/XML archive and unpack it.
You will get some directory:
{flexdoc-xml} -
Save the
flexdoc-xml.licensefile (containing the “OxygenXML Integration” license) in the directory:{flexdoc-xml}/lib -
Now, go to the directory:
{flexdoc-xml}/integrations/OxygenXML/linuxEdit
generator.shfound in that directory, in these lines:#!/bin/sh #---------------------------------------------------------------------- # Specify the location of JRE/JDK 9 (or later) here #---------------------------------------------------------------------- JAVA_HOME="/home/user/jdk-14" #---------------------------------------------------------------------- # Specify the location of OxygenXML home directory #---------------------------------------------------------------------- OXYGENXML_HOME="/home/user/Oxygen XML Editor 22"
Then, specify a permission to allow executing it as a program.
-
Run the
generator.sh. The Generator Dialog should appear: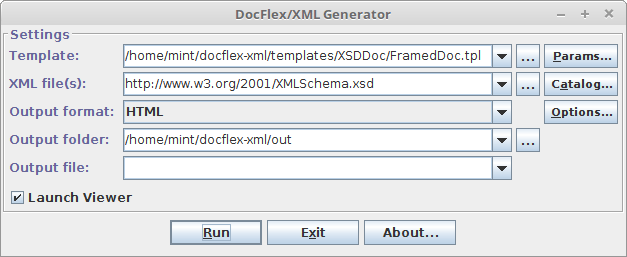
Now, you can test the generation of XML schema documentation with OxygenXML diagrams included.
Check that everything (i.e. the main template and the XML file) is specified similar as shown on the screenshot. Then, click the <Run> button. When the generation finishes, the result documentation should be open automatically in the default HTML browser (if not, you can find it in the output directory).
3. Settings Detail
This section describes all primary settings that are required (or may be needed) to setup and run the OxygenXML Integration. Once you know those settings, you will be able to configure the combined FlexDoc/XML+OxygenXML documentation generator for any particular environment you need (for examples, see Generator Setups).OxygenXML Integration Plugin
OxygenXML Integration is one of the diagramming plugins of FlexDoc/XML, which means it is a Java-service implementation of Element Image Provider. That is a separate Java module packed in the jar-file:-
{flexdoc-xml}/lib/flexdoc-xml-oxygenxml.jar
{flexdoc-xml} is FlexDoc/XML installation directory. That file must be included in the Java module path
in order to run FlexDoc/XML+OxygenXML.
Besides that, the service name itself must be specified on the Java command line (that runs generator or template designer) using -m option as follows:
-
-m:IMAGE_PROVIDER=OxygenXML
OS command to run OxygenXML's own DocGen
This setting specifies how to call from Java the OxygenXML's own XML schema documentation generator.-
{OxygenXML Home}\schemaDocumentation.bat
-
{OxygenXML Home}/schemaDocumentation.sh
cmd.exeon Windowsshon Linux
On Windows, the whole command launching the OxygenXML's own doc-generator will look like this:
-
cmd.exe /C "C:\Program Files\Oxygen XML Editor 22\schemaDocumentation.bat"
-
sh "/home/user/Oxygen XML Editor 22/schemaDocumentation.sh"
Such a command must be passed to the OxygenXML Integration on the Java command-line that runs FlexDoc/XML. It is done using -m option. Here is the Windows variant:
-
-m:OXYGENXML_COMMAND="cmd.exe /C \"C:\Program Files\Oxygen XML Editor 22\schemaDocumentation.bat\""
'\').
On Linux, the same will look like this:
-
-m:OXYGENXML_COMMAND="sh \"/home/user/Oxygen XML Editor 22/schemaDocumentation.sh\""
Related Template Parameters
Besides the Java command-line settings required to setup the integration as a whole, there are other integration settings relevant only to a particular documentation generator (implemented as a template set). Those settings are exposed as template parameters. See:4. Generator Setups
This section provides full examples of how to setup a combined FlexDoc/XML+OxygenXML documentation generator for some important cases.Windows Batch File
Suppose, you want to generate a framed HTML documentation (with OxygenXML diagrams) using XSDDoc | Templates | FramedDoc.tpl template by the XML schema located at the URL: http://www.w3.org/2001/XMLSchema.xsd.Here is a simple Windows batch file that would launch such a generation (with the red are highlighted settings related to the OxygenXML Integration):
xsddoc.bat
set |
FDH=C:\flexdoc-xml |
||
set |
|
||
| |||
set |
OXYGENXML_HOME=C:\Program Files\Oxygen XML Editor 22 |
||
| |||
java |
-Xmx1024m
--module-path "%MODULE_PATH%"
--module flexdoc.xml/xyz.flexdoc.xml.Generator
|
||
macOS Shell Script File
The same task on macOS.The following shell script file will generate a framed HTML documentation (with OxygenXML diagrams) using XSDDoc | Templates | FramedDoc.tpl template by the XML schema located at the URL: http://www.w3.org/2001/XMLSchema.xsd
xsddoc.command
#!/bin/sh


# FlexDoc/XML home directory

FDH='/home/user/flexdoc-xml'


# FlexDoc/XML module path

MODULE_PATH="$FDH/lib/flexdoc-xml.jar:$FDH/lib/flexdoc-xml-oxygenxml.jar:$FDH/lib/xercesImpl.jar"


# OxygenXML home directory

OXH='/Users/Shared/Oxygen XML Editor'


#-------------------------------------------------------------------------------------

# Run FlexDoc/XML generator to document an XML schema (specified in the last argument)

#-------------------------------------------------------------------------------------


  java
  -Xmx1024m |
  # maximum heap size allocated by JVM


  --module-path "$MODULE_PATH" |
  # module path


  --module flexdoc.xml/xyz.flexdoc.xml.Generator |
  # FlexDoc/XML generator's module / main class


  -m:IMAGE_PROVIDER=OxygenXML |
  # OxygenXML Integration to be Element Image Provider


  -m:OXYGENXML_COMMAND="sh \"$OXH/schemaDocumentationMac.sh\"" |
  # command to run OxygenXML's own xsddoc


  -flexdocconfig "$FDH/macOS/flexdoc.config |
  # FlexDoc main config file prepared for macOS


  -template "$FDH/templates/XSDDoc/FramedDoc.tpl" |
  # main template


  -format HTML -d "$FDH/out" -nodialog -launchviewer=false |
  # output format, output directory etc.


  http://www.w3.org/2001/XMLSchema.xsd
  # XML schema to document
Linux Bash File
The same task on Linux.The following shell script file will generate a framed HTML documentation (with OxygenXML diagrams) using XSDDoc | Templates | FramedDoc.tpl template by the XML schema located at the URL: http://www.w3.org/2001/XMLSchema.xsd
xsddoc.sh
#!/bin/sh


# FlexDoc/XML home directory

FDH='/home/user/flexdoc-xml'


# FlexDoc/XML module path

MODULE_PATH="$FDH/lib/flexdoc-xml.jar:$FDH/lib/flexdoc-xml-oxygenxml.jar:$FDH/lib/xercesImpl.jar"


# OxygenXML home directory

OXH='/home/user/Oxygen XML Editor 22'


#-------------------------------------------------------------------------------------

# Run FlexDoc/XML generator to document an XML schema (specified in the last argument)

#-------------------------------------------------------------------------------------


  java
  -Xmx1024m |
  # maximum heap size allocated by JVM


  --module-path "$MODULE_PATH" |
  # module path


  --module flexdoc.xml/xyz.flexdoc.xml.Generator |
  # FlexDoc/XML generator's module / main class


  -m:IMAGE_PROVIDER=OxygenXML |
  # OxygenXML Integration to be Element Image Provider


  -m:OXYGENXML_COMMAND="sh \"$OXH/schemaDocumentation.sh\"" |
  # command to run OxygenXML's own xsddoc


  -flexdocconfig "$FDH/linux/flexdoc.config |
  # FlexDoc main config file prepared for Linux


  -template "$FDH/templates/XSDDoc/FramedDoc.tpl" |
  # main template


  -format HTML -d "$FDH/out" -nodialog -launchviewer=false |
  # output format, output directory etc.


  http://www.w3.org/2001/XMLSchema.xsd
  # XML schema to document
Running with Apache Ant
You can easily integrate FlexDoc/XML+OxygenXML with the Apache Ant automated build system.
As an example, here is an ANT build.xml file doing the same as the Windows batch file described above.
build.xml
Execute the FlexDoc/XML generator.
-->
All options you want to pass to the FlexDoc/XML Generator should be specified
here with the <arg> elements in the same order as on the command line.
-->
Pass the integration parameter: the OS command to call OxygenXML's own XML schema doc-generator.
The command arguments with spaces must be enclosed in quotes ('"') to be recognized
by the generator as a single argument. Here, such quotes are encoded with '\"',
where the '"' is to encode '"' in XML and '\' before it is to pass the quote
through Windows command line issued by Ant to launches FlexDoc/XML.
-->
Specify one or many data source XML files to be processed by the specified template.
Both local pathnames and URLs are allowed.
In this example, it is an XML schema to be documented.
-->
To run that build.xml file, you can use a Windows batch file specified like the following:
set ANT_HOME=C:\apache-ant
set PATH=%ANT_HOME%\bin;%PATH%
set JAVA_HOME=C:\Program Files\Java\jdk-14
call %ANT_HOME%\bin\ant.bat xsddoc
build.xml file!
Running with Apache Maven
How to run FlexDoc/XML with Maven is basically explained on this page: FlexDoc/XML | Integrations | Apache Maven.The following project POM file shows how to configure the FlexDoc/XML Maven Plugin to generate a framed HTML XML schema documentation by the XML schema located at http://www.w3.org/2001/XMLSchema.xsd using FlexDoc/XML | XSDDoc | FramedDoc.tpl + OxygenXML Integration, so that the result doc would appear on the “Project Reports” page of a Maven-generated project site.
pom.xml
Reporting section.
All reports for "Project Reports" page of the Maven-generated site
should be specified here.
-->
Specify Element Image Provider class path.
Since both FlexDoc/XML Maven Plugin and the generator called from it are executed in non-modular mode,
any special Java classes necessary to run the Element Image Provider must be specified here!
-->
Pass the integration parameter: the OS command to call OxygenXML's own XML schema doc-generator.
The command arguments with spaces must be enclosed in quotes ('"') to be recognized
by the generator as a single argument.
-->
Specify one or many data source XML files to be processed by the specified template.
(Both local pathnames and URLs are allowed.)
In this example, it is an XML schema to be documented.
-->
Specify the output directory name.
The plugin will convert it into the absolute pathname of the output directory,
which is passed further both to Maven and to FlexDoc/XML Generator (via -d option).
-->
To run that pom.xml file, you can use a Windows batch file specified like the following:
set JAVA_HOME=C:\Program Files\Java\jdk-14
set M2_HOME=C:\apache-maven
set MAVEN_OPTS=-Xms512m -Xmx1024m
call %M2_HOME%\bin\mvn.bat site:site
pom.xml file!
Using XML Catalog
Some XML schemas may import or include other XML schemas, at that provide as a reference only the imported namespace URI, e.g.:-
<import namespace="http://schemas.xmlsoap.org/wsdl/"/>
-
<xs:include schemaLocation="urn:oasis:names:tc:dita:xsd:glossaryGrp.xsd:1.1"/>
XML catalogs can help to resolve physical locations of XML schema files. They redirect abstract URIs to physical URLs. For more details about XML catalogs, please read: FlexDoc/XML | Documentation | Installation / Configuration Files | XML Catalogs.
Both FlexDoc/XML and Oxygen XML can use XML catalogs.
Example
As an example, let's see how to generate an XML schema documentation (with all OxygenXML-generated diagrams) for the XML schemas for WSDL 1.1:-
http://schemas.xmlsoap.org/wsdl/

http://schemas.xmlsoap.org/wsdl/soap/

http://schemas.xmlsoap.org/wsdl/soap12/wsdl11soap12.xsd

http://schemas.xmlsoap.org/wsdl/http/

http://schemas.xmlsoap.org/wsdl/mime/
http://schemas.xmlsoap.org/wsdl/soap12/wsdl11soap12.xsd).
The XML schema:
-
http://schemas.xmlsoap.org/wsdl/
<xs:import> element:
-
<xs:import namespace="http://schemas.xmlsoap.org/wsdl/"/>
That is not enough for Oxygen XML to process such an import (even though the schema file is located by the same URL as the target namespace URI). But, the problem can be fixed with the following XML catalog file:
catalog.xml
When that catalog.xml file has been specified in OxygenXML as shown on this screenshot:
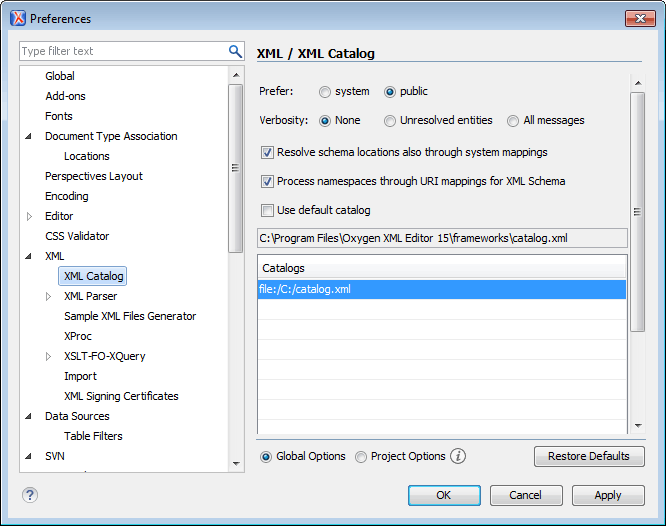
In this particular case it wasn't needed because XSDDoc is programmed to check automatically if a namespace URI points to the physical schema. But, for instance, to generate XML Schemas for DITA 1.1, setting the XML catalog (http://docs.oasis-open.org/dita/v1.1/OS/schema/catalog.xml) will be required for both OxygenXML and FlexDoc/XML.

